
Google Cloud SQL is a fully managed relational database service for MySQL, Postgresql and SQL Server. It provides a helpful way of autoscaling and managing your SQL-based databases on the cloud without breaking a sweat.
It is an alternative to Amazon’s Relational Database Service and provides almost similar features to Amazon’s RDS.
Managed Relational Databases have become so popular over the years because they provide security, scalability and backups making the work of a System Admin to be easy.
Mission-critical applications that require protection from DDOS attacks benefit from using managed databases and thus they are an important addition to your tech stack.
In this tutorial, I will show you how to install the cloud SQL auth proxy on Ubuntu and connect it to your Cloud SQL instance. I will use MySQL database as the reference but you are free to use any database of your choice.
What is the use of Cloud SQL Proxy?
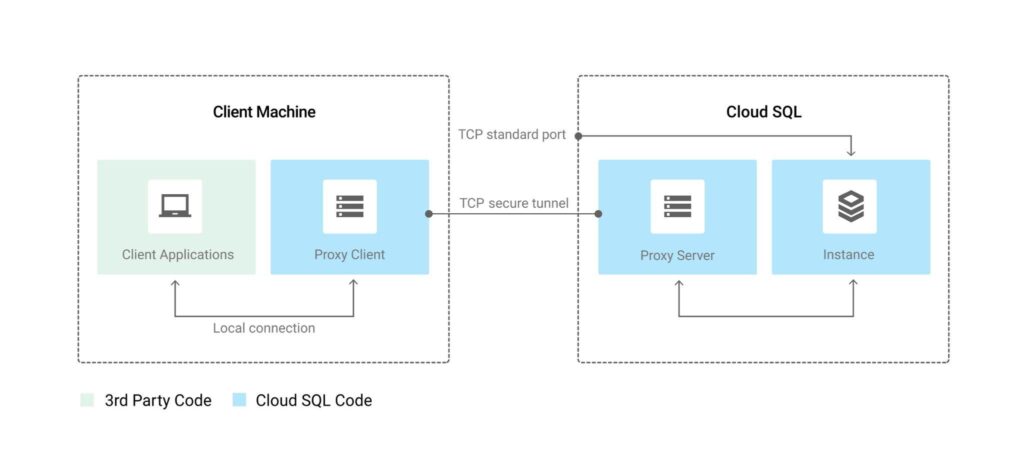
Cloud SQL Proxy allows us to connect to Google Cloud SQL from our local client machines or other servers. For example, you can have your application deployed on
Cloud SQL Proxy can help connect to Google Cloud in a clean and easy way.
It creates a secure TCP connection between your Server and your Cloud SQL instance and its sole purpose is to communicate with your database through the secure TCP tunnel.
How to install Google Cloud SQL Proxy on Ubuntu 22.04 | 20.04
Prerequisites
- An ubuntu server provided by your hosting provider
To install the auth proxy to an ubuntu server, we can follow the following steps:
SSH into your server
If you have a server in production, you can SSH into the server.
ssh root@101.100.200.120
Update System and install wget
We can update the APT package manager and install wget.
sudo apt update && sudo apt install wget Install the Cloud SQL Auth proxy Client
The next step is to download and install the cloud SQL Auth proxy on our server
wget https://dl.google.com/cloudsql/cloud_sql_proxy.linux.amd64 -O cloud_sql_proxyMake the cloud SQL auth proxy executable
chmod +x cloud_sql_proxyMove the executable file to the bin folder
sudo mv ~/cloud_sql_proxy /usr/local/bin
Create a service account
A Service Account allows a system to authenticate itself when accessing Data from Google APIs. Access to Google is granted based on the IAM and is specified in the service account. This makes it easy for us to specify which services our Application will have access to.
- In your Google Cloud Console, head over to the Service Accounts Section
- Select your project and Create a Service Account.
- Once the Service account is created, you will be assigned a random email address for your service account
- The next step is to create a Key which you will use in our Ubuntu server.
- In the keys tab in your newly created service account, click on the add key button and choose the JSON option

This will create a new key with its corresponding service account JSON file which you can download to your local pc.
You can use an FTP client such as WinSCP to upload the service account JSON file to the server
Creating a Cloud SQL instance
The next step is to create a cloud SQL instance. This instance will contain a database server such as MySQL server and the actual database for our tech stack.
- Head over to the Cloud SQL Tab and create a new Cloud SQL instance
- Choose your Database Engine. In this case, I will choose the MYSQL instance. You are free to choose your preferred instance.
- The next step is to name your instance and add a password.
- Set up the configurations and choose the region and create your instance.
- Once the instance is created, you will be assigned a public IP address and connection name which you can use to connect to your SQL instance.
Configure Cloud SQL Proxy
The next step is to configure Cloud SQL Auth Proxy. We will first need to create a service file for the proxy. This will allow us to run the Proxy as a service and it will be restarted each time the server is rebooted.
sudo nano /lib/systemd/system/cloudsqlproxy.serviceCopy and paste the following configurations
[Install]
WantedBy=multi-user.target

[Unit]
Description=Google Cloud Compute Engine SQL Proxy
Requires=systemd-networkd.service
After=systemd-networkd.service

[Service]
Type=simple
WorkingDirectory=/usr/local/bin
ExecStart=/usr/local/bin/cloud_sql_proxy -instances=your_project:your_instance’s region:cloudsql_instance_name=tcp:3306 -credential_file=/var/default-account.json &
Restart=always
StandardOutput=journal
User=root
Replace the values above with yours:
• your_project
• your_instance’s_region e.g europe-west1
• cloudsql_instance_name
• port e.g 3306 or something else not used in the server.
Save the file by pressing Ctrl+S.
Connect to the Cloud SQL using Cloud SQL Proxy
We now need to connect to Cloud SQL by starting the cloud SQL service
sudo systemctl daemon-reloadWe can first enable the service and start the service
sudo systemctl start cloudsqlproxy
sudo systemctl enable cloudsqlproxy
You can find more information in their documentation.
Install Mysql Client
We can now install MySQL client to interact with our Mysql Database in Google Cloud
sudo apt-get install mysql-clientTo interact with the database, we can simply use the default MySQL client commands
mysql -u root -p passwordThis will log in to the MySQL database on Google Cloud via the Cloud SQL proxy making it easy for you to interact with your database from anywhere.
Conclusion
In this guide, we have covered how to install Google Cloud SQL Auth Proxy and how to connect to Cloud SQL instances. I hope this guide was insightful. Thank you for reading.