When building a REST API it is almost a given that you have to create documentation for the API. This allows other developers to consume your API with ease.
Developers praise most popular software such as Stripe for having good documentation and this has resulted in Stripe being used by a lot of developers.
Good documentation can be a powerful tool for business especially if a company is dependent on other developers building on top of their platform.
Platforms such as Shopify have invested a lot of effort in providing good documentation to developers which then causes a ripple effect of attracting more developers to build their solutions on top of Shopify.
In this tutorial, we will cover how to document your Laravel REST API.
I will try and document the REST API I created earlier. You can find its article here.
Features of a Good API Documentation
A well-documented API should have the following:
- An Introduction/Explanation of what the API does
- An Authentication Guide
- A List of the Resources Available for Consuming.
- Examples of requests and their corresponding responses with descriptive messages, errors etc.
- Code Snippets of popular languages
Your API Documentation can be static or interactive depending on your needs but should have these features above in order to be somewhat complete.
Some other things you might add are:
- Changelog
- Provide Tutorials
- Separate Documentation by API Version.
- Terms of Use and Rate Limiting
- SDK examples if available.
A bonus tip is to add curl requests as part of the Code Snippets to allow developers whose language is not featured to easily understand the format of the Requests.
Luckily for us, there are two popular packages that can help generate API documentation with minimal effort; Swagger(OpenAPI) and Scribe.
In this tutorial, I will use Scribe to generate documentation for my API.
If you want to learn how to document your API using Swagger(OpenAPI), you can read this article.
How to Document a REST API in Laravel
The scribe package allows us to create well-optimized API Documentation with little to no effort. It provides Code Snippets and a bare-bone skeleton which we can use to our advantage to generate REST API documentation in a fast and easy way.
Let’s get started.
Install Scribe
The first step is to install the Scribe Package
composer require --dev knuckleswtf/scribe
Publish Configurations
We can then publish the package’s configurations
php artisan vendor:publish --tag=scribe-configThis will create a scibe.php file in the config folder.
Update the configuration file.
There are a few things we need to update in the config/scribe.php file. The first one is the title.
You can change it or leave it as is and it will use the Application’s default name.
The next one is the description. You can provide a short description of your API.
The next configuration is the base url. Scribe will use the default App URL unless you specify one. I will leave mine as the default app URL.
Other Configurations that can be changed include auth, type and logo. You can customize the configurations to match your API.
My final configuration file resembles the one below.
// config/scribe.php

<?php

use Knuckles\Scribe\Extracting\Strategies;

return [

    'theme' => 'default',

    /*
     * The HTML <title> for the generated documentation. If this is empty, Scribe will infer it from config('app.name').
     */
    'title' => 'Laravel REST API',

    /*
     * A short description of your API. Will be included in the docs webpage, Postman collection and OpenAPI spec.
     */
    'description' => 'A simple REST API in Laravel',

    /*
     * The base URL displayed in the docs. If this is empty, Scribe will use the value of config('app.url').
     */
    'base_url' => null,

    /*
     * Tell Scribe what routes to generate documentation for.
     * Each group contains rules defining which routes should be included ('match', 'include' and 'exclude' sections)
     * and settings which should be applied to them ('apply' section).
     */
    'routes' => [
        [
            /*
             * Specify conditions to determine what routes will be a part of this group.
             * A route must fulfill ALL conditions to be included.
             */
            'match' => [
                /*
                 * Match only routes whose paths match this pattern (use * as a wildcard to match any characters). Example: 'users/*'.
                 */
                'prefixes' => ['api/*'],

                /*
                 * Match only routes whose domains match this pattern (use * as a wildcard to match any characters). Example: 'api.*'.
                 */
                'domains' => ['*'],

                /*
                 * [Dingo router only] Match only routes registered under this version. Wildcards are not supported.
                 */
                'versions' => ['v1'],
            ],

            /*
             * Include these routes even if they did not match the rules above.
             * The route can be referenced by name or path here. Wildcards are supported.
             */
            'include' => [
                // 'users.index', 'healthcheck*'
            ],

            /*
             * Exclude these routes even if they matched the rules above.
             * The route can be referenced by name or path here. Wildcards are supported.
             */
            'exclude' => [
                // '/health', 'admin.*'
            ],

            /*
             * Settings to be applied to all the matched routes in this group when generating documentation
             */
            'apply' => [
                /*
                 * Additional headers to be added to the example requests
                 */
                'headers' => [
                    'Content-Type' => 'application/json',
                    'Accept' => 'application/json',
                ],

                /*
                 * If no @response or @transformer declarations are found for the route,
                 * Scribe will try to get a sample response by attempting an API call.
                 * Configure the settings for the API call here.
                 */
                'response_calls' => [
                    /*
                     * API calls will be made only for routes in this group matching these HTTP methods (GET, POST, etc).
                     * List the methods here or use '*' to mean all methods. Leave empty to disable API calls.
                     */
                    'methods' => ['GET'],

                    /*
                     * Laravel config variables which should be set for the API call.
                     * This is a good place to ensure that notifications, emails and other external services
                     * are not triggered during the documentation API calls.
                     * You can also create a `.env.docs` file and run the generate command with `--env docs`.
                     */
                    'config' => [
                        'app.env' => 'documentation',
                        // 'app.debug' => false,
                    ],

                    /*
                     * Query parameters which should be sent with the API call.
                     */
                    'queryParams' => [
                        // 'key' => 'value',
                    ],

                    /*
                     * Body parameters which should be sent with the API call.
                     */
                    'bodyParams' => [
                        // 'key' => 'value',
                    ],

                    /*
                     * Files which should be sent with the API call.
                     * Each value should be a valid path (absolute or relative to your project directory) to a file on this machine (but not in the project root).
                     */
                    'fileParams' => [
                        // 'key' => 'storage/app/image.png',
                    ],

                    /*
                     * Cookies which should be sent with the API call.
                     */
                    'cookies' => [
                        // 'name' => 'value'
                    ],
                ],
            ],
        ],
    ],

    /*
     * The type of documentation output to generate.
     * - "static" will generate a static HTMl page in the /public/docs folder,
     * - "laravel" will generate the documentation as a Blade view, so you can add routing and authentication.
     */
    'type' => 'laravel',

    /*
     * Settings for `static` type output.
     */
    'static' => [
        /*
         * HTML documentation, assets and Postman collection will be generated to this folder.
         * Source Markdown will still be in resources/docs.
         */
        'output_path' => 'public/docs',
    ],

    /*
     * Settings for `laravel` type output.
     */
    'laravel' => [
        /*
         * Whether to automatically create a docs endpoint for you to view your generated docs.
         * If this is false, you can still set up routing manually.
         */
        'add_routes' => true,

        /*
         * URL path to use for the docs endpoint (if `add_routes` is true).
         * By default, `/docs` opens the HTML page, `/docs.postman` opens the Postman collection, and `/docs.openapi` the OpenAPI spec.
         */
        'docs_url' => '/docs',

        /*
         * Directory within `public` in which to store CSS and JS assets.
         * By default, assets are stored in `public/vendor/scribe`.
         * If set, assets will be stored in `public/{{assets_directory}}`
         */
        'assets_directory' => null,

        /*
         * Middleware to attach to the docs endpoint (if `add_routes` is true).
         */
        'middleware' => [],
    ],

    'try_it_out' => [
        /**
         * Add a Try It Out button to your endpoints so consumers can test endpoints right from their browser.
         * Don't forget to enable CORS headers for your endpoints.
         */
        'enabled' => true,

        /**
         * The base URL for the API tester to use (for example, you can set this to your staging URL).
         * Leave as null to use the current app URL (config(app.url)).
         */
        'base_url' => null,

        /**
         * Fetch a CSRF token before each request, and add it as an X-XSRF-TOKEN header. Needed if you're using Laravel Sanctum.
         */
        'use_csrf' => false,

        /**
         * The URL to fetch the CSRF token from (if `use_csrf` is true).
         */
        'csrf_url' => '/sanctum/csrf-cookie',
    ],

    /*
     * How is your API authenticated? This information will be used in the displayed docs, generated examples and response calls.
     */
    'auth' => [
        /*
         * Set this to true if any endpoints in your API use authentication.
         */
        'enabled' => true,

        /*
         * Set this to true if your API should be authenticated by default. If so, you must also set `enabled` (above) to true.
         * You can then use @unauthenticated or @authenticated on individual endpoints to change their status from the default.
         */
        'default' => false,

        /*
         * Where is the auth value meant to be sent in a request?
         * Options: query, body, basic, bearer, header (for custom header)
         */
        'in' => 'bearer',

        /*
         * The name of the auth parameter (eg token, key, apiKey) or header (eg Authorization, Api-Key).
         */
        'name' => 'token',

        /*
         * The value of the parameter to be used by Scribe to authenticate response calls.
         * This will NOT be included in the generated documentation.
         * If this value is empty, Scribe will use a random value.
         */
        'use_value' => env('SCRIBE_AUTH_KEY'),

        /*
         * Placeholder your users will see for the auth parameter in the example requests.
         * Set this to null if you want Scribe to use a random value as placeholder instead.
         */
        'placeholder' => '<token>',

        /*
         * Any extra authentication-related info for your users. For instance, you can describe how to find or generate their auth credentials.
         * Markdown and HTML are supported.
         */
        'extra_info' => 'You can retrieve your token by logging in to your account.',
    ],

    /*
     * Text to place in the "Introduction" section, right after the `description`. Markdown and HTML are supported.
     */
    'intro_text' => <<<INTRO
This documentation aims to provide all the information you need to work with our API.

<aside>As you scroll, you'll see code examples for working with the API in different programming languages in the dark area to the right (or as part of the content on mobile).
You can switch the language used with the tabs at the top right (or from the nav menu at the top left on mobile).</aside>
INTRO,

    /*
     * Example requests for each endpoint will be shown in each of these languages.
     * Supported options are: bash, javascript, php, python
     * To add a language of your own, see https://scribe.knuckles.wtf/laravel/advanced/example-requests
     *
     */
    'example_languages' => [
        'bash',
        'javascript',
        'php',
        'python'
    ],

    /*
     * Generate a Postman collection (v2.1.0) in addition to HTML docs.
     * For 'static' docs, the collection will be generated to public/docs/collection.json.
     * For 'laravel' docs, it will be generated to storage/app/scribe/collection.json.
     * Setting `laravel.add_routes` to true (above) will also add a route for the collection.
     */
    'postman' => [
        'enabled' => true,

        /*
         * Manually override some generated content in the spec. Dot notation is supported.
         */
        'overrides' => [
            // 'info.version' => '2.0.0',
        ],
    ],

    /*
     * Generate an OpenAPI spec (v3.0.1) in addition to docs webpage.
     * For 'static' docs, the collection will be generated to public/docs/openapi.yaml.
     * For 'laravel' docs, it will be generated to storage/app/scribe/openapi.yaml.
     * Setting `laravel.add_routes` to true (above) will also add a route for the spec.
     */
    'openapi' => [
        'enabled' => true,

        /*
         * Manually override some generated content in the spec. Dot notation is supported.
         */
        'overrides' => [
            // 'info.version' => '2.0.0',
        ],
    ],

    'groups' => [
        /*
         * Endpoints which don't have a @group will be placed in this default group.
         */
        'default' => 'Endpoints',

        /*
         * By default, Scribe will sort groups alphabetically, and endpoints in the order their routes are defined.
         * You can override this by listing the groups, subgroups and endpoints here in the order you want them.
         *
         * Any groups, subgroups or endpoints you don't list here will be added as usual after the ones here.
         * If an endpoint/subgroup is listed under a group it doesn't belong in, it will be ignored.
         * Note: you must include the initial '/' when writing an endpoint.
         */
        'order' => [
            // 'This group will come first',
            // 'This group will come next' => [
            //     'POST /this-endpoint-will-comes-first',
            //     'GET /this-endpoint-will-comes-next',
            // ],
            // 'This group will come third' => [
            //     'This subgroup will come first' => [
            //         'GET /this-other-endpoint-will-comes-first',
            //         'GET /this-other-endpoint-will-comes-next',
            //     ]
            // ]
        ],
    ],

    /*
     * Custom logo path. This will be used as the value of the src attribute for the <img> tag,
     * so make sure it points to an accessible URL or path. Set to false to not use a logo.
     *
     * For example, if your logo is in public/img:
     * - 'logo' => '../img/logo.png' // for `static` type (output folder is public/docs)
     * - 'logo' => 'img/logo.png' // for `laravel` type
     *
     */
    'logo' => false,

    /**
     * Customize the "Last updated" value displayed in the docs by specifying tokens and formats.
     * Examples:
     * - {date:F j Y} => March 28, 2022
     * - {git:short} => Short hash of the last Git commit
     *
     * Available tokens are `{date:<format>}` and `{git:<format>}`.
     * The format you pass to `date` will be passed to PhP's `date()` function.
     * The format you pass to `git` can be either "short" or "long".
     */
    'last_updated' => 'Last updated: {date:F j, Y}',

    'examples' => [
        /*
         * If you would like the package to generate the same example values for parameters on each run,
         * set this to any number (eg. 1234)
         */
        'faker_seed' => null,

        /*
         * With API resources and transformers, Scribe tries to generate example models to use in your API responses.
         * By default, Scribe will try the model's factory, and if that fails, try fetching the first from the database.
         * You can reorder or remove strategies here.
         */
        'models_source' => ['factoryCreate', 'factoryMake', 'databaseFirst'],
    ],

    /**
     * The strategies Scribe will use to extract information about your routes at each stage.
     * If you create or install a custom strategy, add it here.
     */
    'strategies' => [
        'metadata' => [
            Strategies\Metadata\GetFromDocBlocks::class,
            Strategies\Metadata\GetFromMetadataAttributes::class,
        ],
        'urlParameters' => [
            Strategies\UrlParameters\GetFromLaravelAPI::class,
            Strategies\UrlParameters\GetFromLumenAPI::class,
            Strategies\UrlParameters\GetFromUrlParamAttribute::class,
            Strategies\UrlParameters\GetFromUrlParamTag::class,
        ],
        'queryParameters' => [
            Strategies\QueryParameters\GetFromFormRequest::class,
            Strategies\QueryParameters\GetFromInlineValidator::class,
            Strategies\QueryParameters\GetFromQueryParamAttribute::class,
            Strategies\QueryParameters\GetFromQueryParamTag::class,
        ],
        'headers' => [
            Strategies\Headers\GetFromRouteRules::class,
            Strategies\Headers\GetFromHeaderAttribute::class,
            Strategies\Headers\GetFromHeaderTag::class,
        ],
        'bodyParameters' => [
            Strategies\BodyParameters\GetFromFormRequest::class,
            Strategies\BodyParameters\GetFromInlineValidator::class,
            Strategies\BodyParameters\GetFromBodyParamAttribute::class,
            Strategies\BodyParameters\GetFromBodyParamTag::class,
        ],
        'responses' => [
            Strategies\Responses\UseResponseAttributes::class,
            Strategies\Responses\UseTransformerTags::class,
            Strategies\Responses\UseApiResourceTags::class,
            Strategies\Responses\UseResponseTag::class,
            Strategies\Responses\UseResponseFileTag::class,
            Strategies\Responses\ResponseCalls::class,
        ],
        'responseFields' => [
            Strategies\ResponseFields\GetFromResponseFieldAttribute::class,
            Strategies\ResponseFields\GetFromResponseFieldTag::class,
        ],
    ],

    'fractal' => [
        /* If you are using a custom serializer with league/fractal, you can specify it here.
         * Leave as null to use no serializer or return simple JSON.
         */
        'serializer' => null,
    ],

    /*
     * [Advanced] Custom implementation of RouteMatcherInterface to customise how routes are matched
     *
     */
    'routeMatcher' => \Knuckles\Scribe\Matching\RouteMatcher::class,

    /**
     * For response calls, API resource responses and transformer responses,
     * Scribe will try to start database transactions, so no changes are persisted to your database.
     * Tell Scribe which connections should be transacted here.
     * If you only use one db connection, you can leave this as is.
     */
    'database_connections_to_transact' => [config('database.default')]
];
Document your API
The next step is to document your API. Scribe provides two ways how you can document your API; Docblock and Attribute.
Dockblock is a formatted comment that is used to explain a specific segment of a source code.
Attributes on the other hand are classes that can be used to add metadata to other classes.
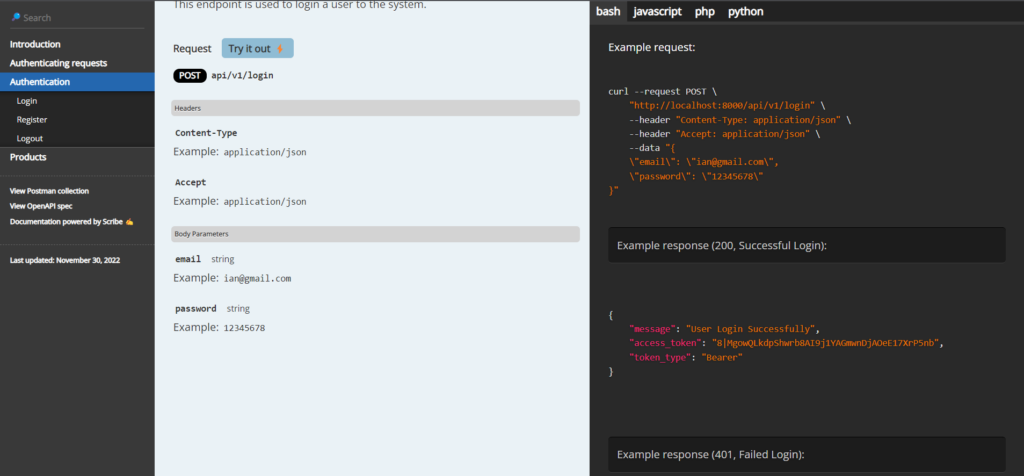
In this section, I will use Docblock to add documentation
/**
     * Login
     *
     * This endpoint is used to login a user to the system.
     *
     * @bodyParam email string required Example: ian@gmail.com
     * @bodyParam password string required Example: 12345678
     *
     * @response scenario="Successful Login" {
     * "message": "User Login Successfully",
     * "access_token": "8|MgowQLkdpShwrb8AI9j1YAGmwnDjAOeE17XrP5nb",
     * "token_type": "Bearer"
     * }
     *
     * @response 401 scenario="Failed Login"{
     * "message": "Invalid login credentials"
     * }
     *
     */
    public function login(Request $request)
    {
      // Add some logic
    }
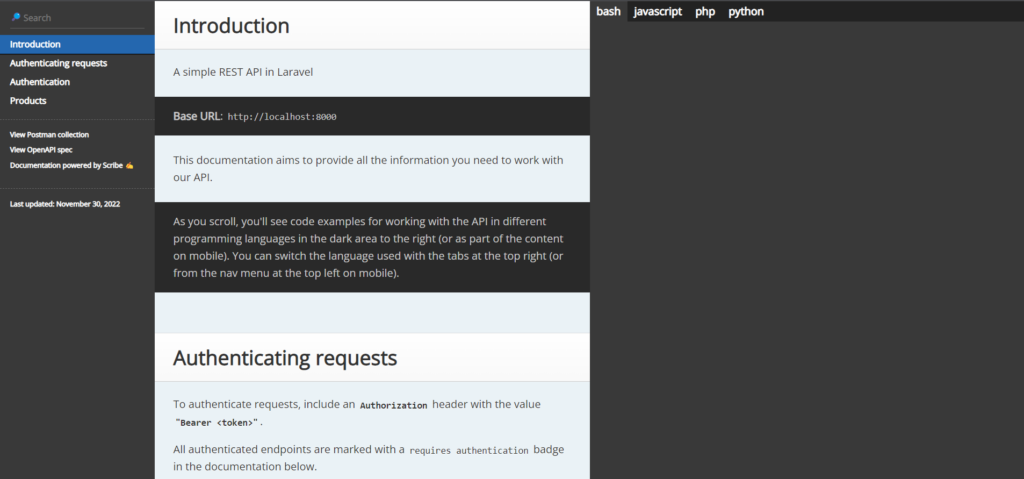
We can generate the documentation using the scribe:generate command
php artisan scribe:generate The resulting documentation is seen below
Grouping Endpoints
By default, most APIs have a lot of resources. These resources can range from Products to Authentication to Orders.
It is important to have a clear structure in your documentation so that other developers working with your API can find the relevant resources easily.
Scribe allows us to group endpoints easily. With a single @group annotation, you can have all your endpoints for a particular resource grouped together.
/**
 * @group Products
 *
 * APIs for managing Products
 */
class ProductsController extends Controller
{
}
This results in structured Documentation as shown

Authentication
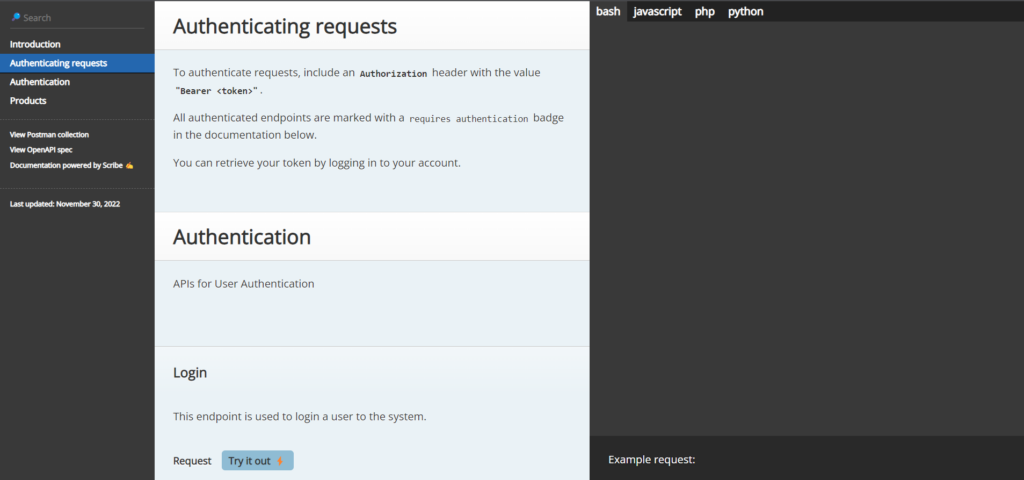
One of the key features of any API is the ability to provide Authentication. It is important to provide a clear way for how other developers will authenticate themselves with your API. This can be through client ids and secrets or the default username and password.
Scribe discusses how you can configure Authentication in this part. This allows other developers to interact with your API through the documentation as if they are logged in and can then view the responses for various API Calls.
It also generates an Authentication guide making your life easier.
Authenticated Endpoints
You might also want to indicate that certain endpoints need authentication in order to access them. Typically this would mean a client would need to provide a valid access token in order to access the resource.
Scribe also provides a cool way of indicating an endpoint is protected. Using the @authenticated annotation, you can have a simple “requires authentication” badge displayed on your documentation.
/**
 * @group Products
 *
 * APIs for managing Products
 *

 * @authenticated
 */
class ProductsController extends Controller
{
}
The badge is displayed as shown

Requesting Headers Metadata
Headers are an important factor in a REST API. They provide important meta-data that tells the API how to respond to your client.
Examples of these meta-data are Content-type, Authorization, and User-agent just to name a few.
For example, a client might want to specify that it is ok receiving JSON-formatted data. Therefore, by adding an Accept: application/json to its headers, the API can format and return the response in JSON format.
Another client might be using XML and as a result, might want to inform the API to return the response in XML format. The client would need to add the Accept: application/xml header so that the API responds with the correct format.
Similarly, an API might be supporting only JSON format and as a result, you might want to notify relevant clients that your API only supports JSON and thus any data passed to or requested from the API must be in JSON format.
Scribe allows us to specify the relevant headers required by our API
/**
 * @group Products
 *
 * APIs for managing Products
 *
 * @header Content-Type application/json
 * @authenticated
 */
class ProductsController extends Controller
{
}
This creates a new section in the documentation stating the relevant headers.

Requesting Query, Url and Body Parameters
The main part of an API is specifying the relevant parameters that can be passed to the API and receive a relevant response.
Parameters can be passed in three main ways; in the body, in the URL or as a query parameter.
Body Parameters
These are variables that are passed to an API mainly through a POST or PUT/PATCH request.
In our case, to add a new product to the database, we make a post request to the /api/v1/products endpoint and pass some relevant data along so that the record is created.
We can specify these parameters using the @bodyParam annotation. We can also specify if the parameters are required.
//App/Http/Controllers/ProductsController

use App\Http\Resources\ProductResource;
use App\Models\Products;
use Illuminate\Http\Request;

/**
     * Add Products to the Database
     *
     * This endpoint is used to add a product to the database.
     *
     * @bodyParam name string required Example: Laptop
     * @bodyParam price double required Example: 199
     * @bodyParam description string required
     *
     *@response 201 scenario="Add a Product"{
     * "data": {
     *   "id": 2,
     *   "product_name": "veritatis",
     *   "product_price": "$30",
     *   "discounted_price": "$27",
     *   "discount": "$3",
     *   "product_description": "Esse cupiditate eaque qui laboriosam quis id."
     * }
     *}
     */
    public function store(Request $request)
    {
        $product_name = $request->input('name');
        $product_price = $request->input('price');
        $product_description = $request->input('description');

        $product = Products::create([
            'name' => $product_name,
            'price' => $product_price,
            'description' => $product_description,
        ]);
        return response()->json([
            'data' => new ProductResource($product)
        ], 201);
    }
Scribe produces the documentation for the Resource as shown

URL Parameters
Sometimes you might want to request a URL parameter to return a more refined response. We usually pass the resource id and the result is a response with a single record.
In my case, I might want to return a single product and thus I can make a GET request to the api/v1/products/1 endpoint and this returns a single record.
Using the @urlParam annotation, you can specify which parameters are required.
//App/Http/Controllers/ProductsController

use App\Http\Resources\ProductResource;
use App\Models\Products;

/**
     * Get a Single Product
     *
     * This endpoint is used to return a single products from the database.
     *
     * @urlParam id integer required The ID of the product.
     *
     * @response scenario="Get a Single Product"{
     * "data": {
     *   "id": 2,
     *   "product_name": "veritatis",
     *   "product_price": "$30",
     *   "discounted_price": "$27",
     *   "discount": "$3",
     *   "product_description": "Esse cupiditate eaque qui laboriosam quis id."
     * }
     *}
     */
    public function show(Products $product)
    {
        return new ProductResource($product);
    }
This will then be included in your API documentation.

Query Parameters
Query parameters can be used to further customize the response returned by an API.
For example, if your API is paginated, you can have the page returned as a query parameter in order to return the response.i.e /api/v1/products?page=4
Scribe provides the @queryParam annotation that allows us to specify query parameters that can be used to customize the response of the API.
//App/Http/Controllers/ProductsController

use App\Http\Resources\ProductResource;
use App\Models\Products;

/**
     * Get All Products
     *
     * This endpoint is used to fetch all products available in the database.
     *
     * @queryParam page int The page number from pagination. Defaut is '1' Example: 1
     *
     * @response scenario="Get All Products"{
     *"data": [
     *    {
     *    "id": 1,
     *        "product_name": "quo",
     *        "product_price": "$15",
     *        "discounted_price": "$13.5",
     *        "discount": "$1.5",
     *        "product_description": "Ut rerum aut deleniti eveniet ad et ullam perferendis."
     *    },
     *    {
     *        "id": 2,
     *        "product_name": "Laptop",
     *        "product_price": "$500",
     *        "discounted_price": "$450",
     *        "discount": "$50",
     *        "product_description": "This is a brand new laptop"
     *    }
     *  ]
     *}
     */
    public function index()
    {
        return ProductResource::collection(Products::paginate(5));
    }
This results in another section containing the query parameters

Documenting Responses
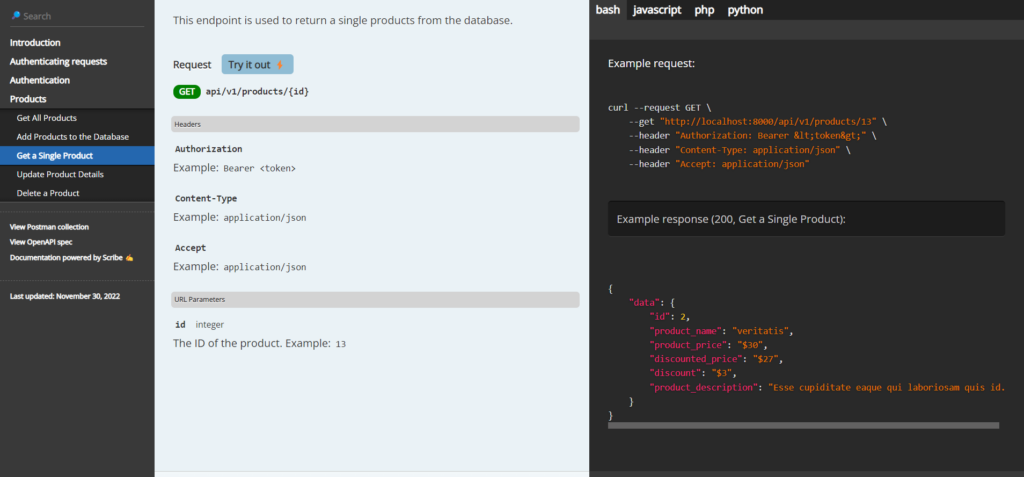
The last section to add to your documentation is the responses. It is important to return a sample response for your API calls so that others can know what to expect when they interact with your API.
You can add a successful response and a failed response with the relevant error messages and status codes so that another developer is able to use the API.
Another annotation provided to us by scribe is @response. You can add a sample response and its status code to your documentation.
//App/Http/Controllers/ProductsController

use App\Http\Resources\ProductResource;
use App\Models\Products;

/**
     * Get a Single Product
     *
     * This endpoint is used to return a single products from the database.
     *
     * @urlParam id integer required The ID of the product.
     *
     * @response scenario="Get a Single Product"{
     * "data": {
     *   "id": 2,
     *   "product_name": "veritatis",
     *   "product_price": "$30",
     *   "discounted_price": "$27",
     *   "discount": "$3",
     *   "product_description": "Esse cupiditate eaque qui laboriosam quis id."
     * }
     *}
     */
    public function show(Products $product)
    {
        return new ProductResource($product);
    }
This will display a successful response and a failed response on your documentation
Scribe provides a lot more features for documenting your responses. You can read it here.
You should run the scribe:generate command each time you want to update your documentation.
Once you have finished your documentation, you can run the command php artisan scribe:generate and your new documentation is now ready.
Head over to yourdomain.com/docs to view your generated documentation.
Key Takeaways
Documenting your API is an essential part of developing your API. It not only makes the life of the ones using it easy but also allows you to explain complex functionalities of your API in a simple and understandable format.
To summarize, your API documentation should follow these 3 C’s;
- Clear – One should be able to understand from a bird’s eye view what your API does
- Concise – One should be able to have all their questions about your API answered by the documentation
- Complete – One should be able to interact with the API without any help simply by reading the Documentation
In Closing
Documenting your API is a must if you want other developers to use your API. Your API documentation can also be used as a Content Marketing Machine as it can bring SEO traffic to your business from people searching for solutions to their problems.
You can find the sample documentation generated in this article here.
I hope this article helped you document your REST API. What do you think I left out? Thank you for reading.
You can watch this video to learn how to use your Technical Documentation as a Content Marketing Tool
