
When it comes to sending out notifications from our application to users, there are many ways to do so. You can send out emails, SMS, or even Push Notifications. These channels help us create solutions that deliver custom notifications to users at scale.
Push Notifications have become essential features for modern web and mobile applications. They provide personalized user experiences as they can be tailored to be delivered when a user is actively using their device.
In this article, we will cover how to send out push notifications using Firebase, Laravel, and React.
What exactly are Push Notifications?
Push notifications are short messages or alerts sent out from a server to a user’s device. They are mainly used for informing users about updates, encouraging users to take action, and providing a real-time communication channel because they are delivered instantly and pop up right in front of a user and thus are good for communicating time-sensitive information at scale.
Push Notifications have become popular especially with marketing teams as they can send out bulk notifications to users at a relatively affordable cost as compared to other channels such as SMS.
Companies such as PushOwl and OneSignal have grown tremendously due to the increase in demand for Web Push Notifications.
We will use Firebase Cloud Messaging to send messages at no cost. This provides us with a powerful solution we can leverage to send out push notifications from our applications for free.
1. Create a Laravel project
We will first need to create a Laravel project if we don’t have one. If you have an already existing application then you can skip this step
To create a project, we can use the command
composer create-project --prefer-dist laravel/laravel testIf you have the Laravel installer enabled globally on your pc, you can use the new command
laravel new test2. Create Auth using scaffolding
The next step is to generate the auth scaffold. There are multiple ways of generating auth scaffold in Laravel including Laravel Jetstream and Laravel UI but in this case, I will use Laravel breeze. I will use React as the front-end framework in this tutorial.
composer require laravel/breeze --dev
php artisan breeze:install react
npm install && npm run dev
3. Add a device token column to the users table
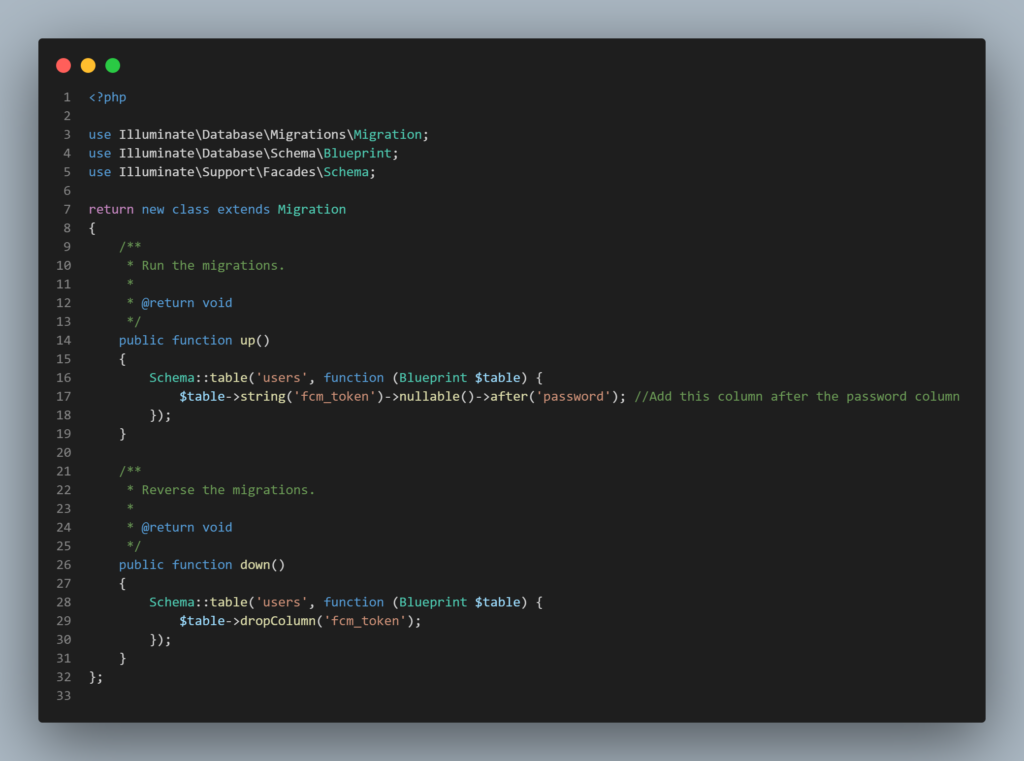
Once the application is set up, we then need to add a column to the user table which will hold the user’s device token that Firebase assigns. That way, we can send push notifications to a specific user if need be.
To do so, we will need to create a migration file to update the users table
php artisan make:migration add_fcm_device_token_column_to_users_table --table=users This will create a new migration file where we will need to add the column
<?php

use Illuminate\Database\Migrations\Migration;
use Illuminate\Database\Schema\Blueprint;
use Illuminate\Support\Facades\Schema;

return new class extends Migration
{
    /**
     * Run the migrations.
     */
    public function up(): void
    {
        Schema::table('users', function (Blueprint $table) {
            $table->string('fcm_token')->nullable()->after('password'); //Add this column after password column
        });
    }

    /**
     * Reverse the migrations.
     */
    public function down(): void
    {
        Schema::table('users', function (Blueprint $table) {
            $table->dropColumn('fcm_token');
        });
    }
};
4. Import Firebase SDK
We then need to add the Laravel Firebase package to our application
composer require kreait/laravel-firebaseIf for some reason you experience an error during installation regarding the platform requirements, you can add the –ignore-platform-reqs flag that will install the package ignoring the underlying platform requirements. You can use the command as shown:
composer require kreait/laravel-firebase --ignore-platform-reqs We need to publish the package config file so that we can change some configurations
php artisan vendor:publish --provider="Kreait\Laravel\Firebase\ServiceProvider" --tag=config Configuration
We then need to create a Firebase project in the Firebase Console.
The next step is to download the JSON file provided by Firebase and add it to the root of our application


We may also want to update the package configurations.
The package by default has autodiscovery set to true. This means that the package will try and detect a Firebase credentials JSON file.
I personally set it to false as I don’t want to ship bugs into production in the case where the Firebase credential file is missing. I also try and specify the location for the JSON file just to be safe in the case where the environment variables would be changed.
 The final config/firebase.php file will look something like this
//config/firebase.php
<?php

...

'credentials' => [
                'file' => env('FIREBASE_CREDENTIALS', base_path('firebase_credentials.json')),
            ],

...
5. Handle Device Registration
Now that all the configurations are set, we need to add the logic that will handle the device tokens sent for each user.
php artisan make:controller FirebasePushControllerWe then need to add a constructor that will initialize the Firebase Cloud Messaging Service in the controller.
We can use the Firebase Facade provided by the laravel-firebase package and access the messaging method.
use Kreait\Laravel\Firebase\Facades\Firebase;
protected $notification;
public function __construct()
{
    $this->notification = Firebase::messaging();
}
The logic can be separated into two; register the device token and send a notification
Register Device Token
In order to send notifications to various devices, we need to first have a way of storing the tokens in our database. We can create a dedicated method and route to handle the token. We can do this by accessing the currently logged-in user and updating the fcm_token column.
    public function setToken(Request $request)
    {
        $token = $request->input('fcm_token');
        $request->user()->update([
            'fcm_token' => $token
        ]); //Get the currrently logged in user and set their token
        return response()->json([
            'message' => 'Successfully Updated FCM Token'
        ]);
    }
Let’s add a route in either the routes/web.php or routes/api.php file (depending on the type of application you are creating).
// routes/api.php
<?php
Route::post('setToken', [FirebasePushController::class, 'setToken'])->name('firebase.token'); 
How do we obtain the token to be stored?
This depends on the client application you are developing the backend for. You can get the token from an Android client, IOS client, Flutter Client, or web client. If you are using a Laravel API for any of these frontend clients, you can use Laravel Sanctum to handle all your authentication so that you will be able to get the currently logged-in user and update their account with the correct device token.
I am going to use a simple example of a web client using javascript.
Install Firebase
We will first start by installing the Firebase library
npm install firebaseInitialize Firebase SDK
We will then initialize the Firebase SDK by passing our credentials. We will create a folder named resources/js/utils. Here we can create a new file initialize.js. This file will export an instance of Firebase which we will use to interact with the Firebase Cloud Messaging API
// resources/js/utils/initialize.js
import { initializeApp } from 'firebase/app';

// TODO: Replace the following with your app's Firebase project configuration
const firebaseConfig = {
    apiKey: "...",
    authDomain: "...",
    projectId: "...",
    storageBucket: "...",
    messagingSenderId: "...",
    appId: "...",
};

const app = initializeApp(firebaseConfig);

export default app;
Get Device Token
We will then add functionality for requesting permission, retrieving the device token through Firebase SDK, and then sending the token to the backend.
Let’s add this functionality in the AuthenitcatedLayout that comes with the default laravel breeze scaffold.
//resources/js/Layouts/AuthenticatedLayout.jsx
import { useEffect, useState } from "react";
import ApplicationLogo from "@/Components/ApplicationLogo";
import Dropdown from "@/Components/Dropdown";
import NavLink from "@/Components/NavLink";
import ResponsiveNavLink from "@/Components/ResponsiveNavLink";
import { Link, usePage } from "@inertiajs/react";
import app from "@/utils/initialize";
import { getMessaging, getToken, onMessage } from "firebase/messaging";
export default function Authenticated({ user, header, children }) {
const [showingNavigationDropdown, setShowingNavigationDropdown] =
useState(false);
const messaging = getMessaging(app);
const user_id = usePage().props.auth.user.id;
function requestPermission() {
console.log("Requesting permission...");
Notification.requestPermission().then((permission) => {
if (permission === "granted") {
console.log("Notification permission granted.");
}
});
}
useEffect(() => {
getToken(messaging, {
vapidKey: import.meta.env.VITE_VAPID_KEY,
})
.then((currentToken) => {
if (currentToken) {
// Send the token to your server and update the UI if necessary
navigator.sendBeacon(
`/api/setToken?fcm_token=${currentToken}&user_id=${user_id}`
); //ping the server with the new device token
} else {
// Show permission request UI
console.log(
"No registration token available. Request permission to generate one."
);
requestPermission();
// ...
}
})
.catch((err) => {
console.log("An error occurred while retrieving token. ", err);
// ...
});
onMessage(messaging, function ({ notification }) {
new Notification(notification.title, {
body: notification.body,
});
// ...
});
}, []);
return (
<div className="min-h-screen bg-gray-100">
<nav className="bg-white border-b border-gray-100">
<div className="max-w-7xl mx-auto px-4 sm:px-6 lg:px-8">
<div className="flex justify-between h-16">
<div className="flex">
<div className="shrink-0 flex items-center">
<Link href="/">
<ApplicationLogo className="block h-9 w-auto fill-current text-gray-800" />
</Link>
</div>
<div className="hidden space-x-8 sm:-my-px sm:ml-10 sm:flex">
<NavLink
href={route("dashboard")}
active={route().current("dashboard")}
>
Dashboard
</NavLink>
</div>
</div>
<div className="hidden sm:flex sm:items-center sm:ml-6">
<div className="ml-3 relative">
<Dropdown>
<Dropdown.Trigger>
<span className="inline-flex rounded-md">
<button
type="button"
className="inline-flex items-center px-3 py-2 border border-transparent text-sm leading-4 font-medium rounded-md text-gray-500 bg-white hover:text-gray-700 focus:outline-none transition ease-in-out duration-150"
>
{user.name}
<svg
className="ml-2 -mr-0.5 h-4 w-4"
xmlns="http://www.w3.org/2000/svg"
viewBox="0 0 20 20"
fill="currentColor"
>
<path
fillRule="evenodd"
d="M5.293 7.293a1 1 0 011.414 0L10 10.586l3.293-3.293a1 1 0 111.414 1.414l-4 4a1 1 0 01-1.414 0l-4-4a1 1 0 010-1.414z"
clipRule="evenodd"
/>
</svg>
</button>
</span>
</Dropdown.Trigger>
<Dropdown.Content>
<Dropdown.Link
href={route("profile.edit")}
>
Profile
</Dropdown.Link>
<Dropdown.Link
href={route("logout")}
method="post"
as="button"
>
Log Out
</Dropdown.Link>
</Dropdown.Content>
</Dropdown>
</div>
</div>
<div className="-mr-2 flex items-center sm:hidden">
<button
onClick={() =>
setShowingNavigationDropdown(
(previousState) => !previousState
)
}
className="inline-flex items-center justify-center p-2 rounded-md text-gray-400 hover:text-gray-500 hover:bg-gray-100 focus:outline-none focus:bg-gray-100 focus:text-gray-500 transition duration-150 ease-in-out"
>
<svg
className="h-6 w-6"
stroke="currentColor"
fill="none"
viewBox="0 0 24 24"
>
<path
className={
!showingNavigationDropdown
? "inline-flex"
: "hidden"
}
strokeLinecap="round"
strokeLinejoin="round"
strokeWidth="2"
d="M4 6h16M4 12h16M4 18h16"
/>
<path
className={
showingNavigationDropdown
? "inline-flex"
: "hidden"
}
strokeLinecap="round"
strokeLinejoin="round"
strokeWidth="2"
d="M6 18L18 6M6 6l12 12"
/>
</svg>
</button>
</div>
</div>
</div>
<div
className={
(showingNavigationDropdown ? "block" : "hidden") +
" sm:hidden"
}
>
<div className="pt-2 pb-3 space-y-1">
<ResponsiveNavLink
href={route("dashboard")}
active={route().current("dashboard")}
>
Dashboard
</ResponsiveNavLink>
</div>
<div className="pt-4 pb-1 border-t border-gray-200">
<div className="px-4">
<div className="font-medium text-base text-gray-800">
{user.name}
</div>
<div className="font-medium text-sm text-gray-500">
{user.email}
</div>
</div>
<div className="mt-3 space-y-1">
<ResponsiveNavLink href={route("profile.edit")}>
Profile
</ResponsiveNavLink>
<ResponsiveNavLink
method="post"
href={route("logout")}
as="button"
>
Log Out
</ResponsiveNavLink>
</div>
</div>
</div>
</nav>
{header && (
<header className="bg-white shadow">
<div className="max-w-7xl mx-auto py-6 px-4 sm:px-6 lg:px-8">
{header}
</div>
</header>
)}
<main>{children}</main>
</div>
);
}
We need to pass a Vapid Key when requesting a token. This can be obtained from your Firebase Console.
What are Vapid Keys and How to Obtain a Vapid Key
Vapid Keys are key-value pair that are used for authorizing sending web push requests. Firebase creates a public key and a private key which it then uses to authorize our application to send out push notifications.
To obtain a new key pair, navigate to the Cloud Messaging tab and scroll to the Web Configuration section. In the Web push Certificates section, click generate key pair. Once it has generated the key pair, copy the public key string and add it to your .env file.
We are also using navigator.sendBeacon to ping the backend with the new device token. This is a cool method we can use to asynchronously send POST requests to a server. It is important because it does not expect a request to be fulfilled.
It only pings a server with relevant data. For our use case, it is perfect because we need to ping the server each time a new device token is generated and thus sendBeacon can send the new token in the background while not affecting the UX.
We also need to handle any notifications we receive from Firebase in the Foreground(When the user is viewing the current page). Firebase provides the onMessage() method that we can use to listen for any notifications received when the user is currently viewing our application.
Handling Background Notifications
While it is good to receive notifications in the foreground, in most cases, users at a given time are not actively viewing your application. For example, if a user granted your application to send updates when a new article is published, we might need to send a push notification to all users. In this case, most of them might not be actively reading your content at the time the notification is sent out.
This is where background notifications come in handy. Firebase allows us to also handle background notifications by registering a service worker.
We will need to create a file named firebase-messaging-sw.js in the public folder.
//public/firebase-messaging-sw.js

importScripts(
    "https://www.gstatic.com/firebasejs/10.0.0/firebase-app-compat.js"
);
importScripts(
    "https://www.gstatic.com/firebasejs/10.0.0/firebase-messaging-compat.js"
);

firebase.initializeApp({
    apiKey: "...",
    authDomain: "...",
    projectId: "...",
    storageBucket: "...",
    messagingSenderId: "...",
    appId: "...",
});

const messaging = firebase.messaging();

messaging.onBackgroundMessage(({ notification }) => {
    console.log("[firebase-messaging-sw.js] Received background message ");
    // Customize notification here
    const notificationTitle = notification.title;
    const notificationOptions = {
        body: notification.body,
    };

    if (notification.icon) {
        notificationOptions.icon = notification.icon;
    }

    self.registration.showNotification(notificationTitle, notificationOptions);
});
This service worker enables us to handle background messages as it will send out notifications to all users regardless of whether they are currently reading other articles or they are not using your application.
With that, we have handled the front-end side of the application. We can now work on the logic of sending out notifications.
6. Send Push Notifications
Once we have the token stored in the database, we can now send a push notification to a user device based on the token stored. There are multiple ways we can send notifications. We can send to currently logged-in users, all users who have subscribed to the push notifications, and even a specific segment of users. The possibilities are endless. In my case, I am going to send a notification to the currently logged-in user.
To do so I will first need to get the currently logged-in user. Luckily Laravel provides a helper to do so. The auth()->user() helper returns the currently logged-in user. To get the fcm_token for the user we can just retrieve it using the helper auth()->user()->fcm_token.
We can then use CloudMessage class from the laravel firebase package to prepare the notification.
use Kreait\Firebase\Messaging\CloudMessage;
public function notification(Request $request)
{
    $FcmToken = auth()->user()->fcm_token;
    $title = $request->input('title');
    $body = $request->input('body');
    $message = CloudMessage::fromArray([
      'token' => $FcmToken,
      'notification' => [
        'title' => $title,
         'body' => $body
        ],
     ]);

   $this->notification->send($message);
}
The next step is to create the route that will send the notifications.
Route::post('send/notification',[FirebasePushController::class,'notification'])->name('firebase.send');
With that, we are done with the logic. I will just add a form on the Dashboard.jsx file from which I can send the message.
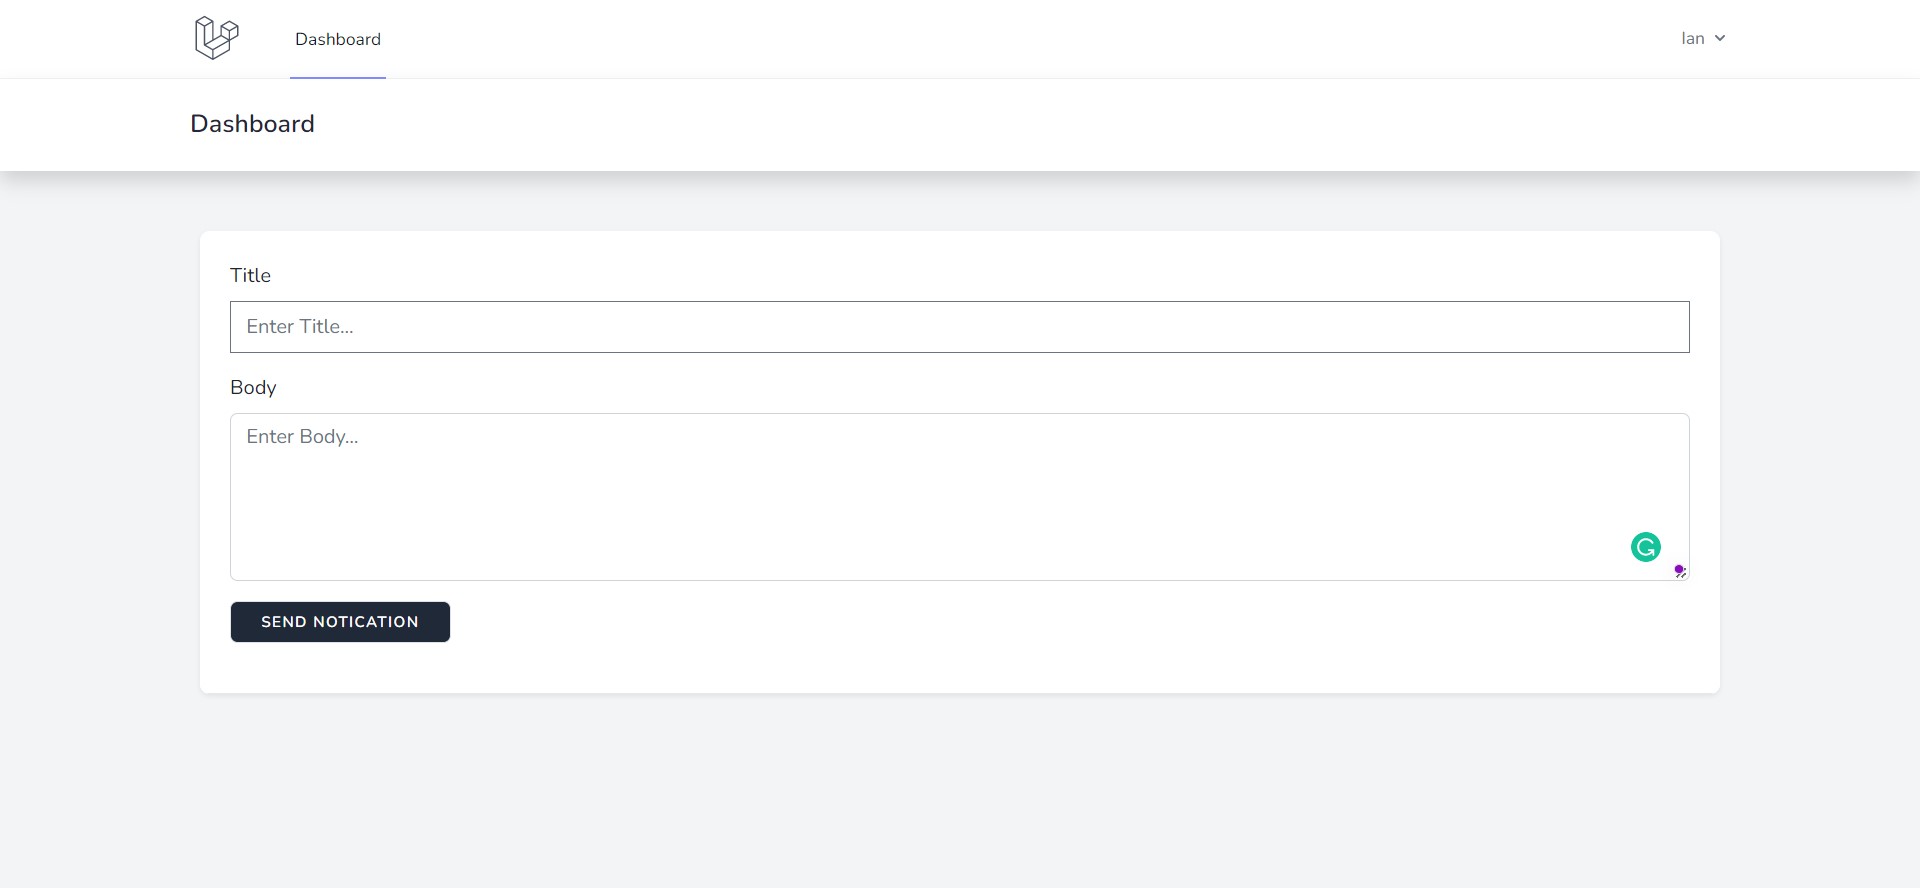
When we send out notifications, a push notification will now be received by the currently logged-in user. You can modify the logic to send out to all users that have subscribed to receive push notifications.
Conclusion
When it comes to sending out push notifications, Firebase provides a simple yet powerful API that we can leverage to our advantage. In this article, we have learnt how to use Laravel and React, and Firebase to send out push notifications.
Firebase provides other useful products that we can use in our Laravel application. You can read more on how to integrate other Firebase products into your Laravel application.
If you have any questions, feel free to reach out. Thanks for reading.